16. Spring Boot Security
16.1. Spring Boot Security介绍
https://www.javainuse.com/spring/sprboot_sec
16.1.1. 启用Security
1 2 3 4 | <dependency>
<groupId>org.springframework.boot</groupId>
<artifactId>spring-boot-starter-security</artifactId>
</dependency>
|
16.1.1.1. 覆盖默认用户和密码
By adding some configuration into the application.properties file:
1 2 | spring.security.user.name=user
spring.security.user.password=password
|
16.1.2. 禁用Security
To discard the security auto-configuration and add our own configuration, we need to exclude the SecurityAutoConfiguration class.
This can be done via a simple exclusion:
1 2 3 4 5 6 7 | @SpringBootApplication(exclude = { SecurityAutoConfiguration.class })
public class SpringBootSecurityApplication {
public static void main(String[] args) {
SpringApplication.run(SpringBootSecurityApplication.class, args);
}
}
|
Or by adding some configuration into the application.properties file:
spring.autoconfigure.exclude=org.springframework.boot.autoconfigure.security.SecurityAutoConfiguration
在某些特殊情况下,此设置还不够。
例如,如果classpath中有Actuator的。 我们需要继续排除ManagementWebSecurityAutoConfiguration类。
16.1.3. 定制Security
1 2 3 4 5 6 7 8 9 10 11 12 13 14 15 16 17 18 19 20 21 22 23 24 25 26 27 28 | @Configuration
@EnableWebSecurity
public class BasicConfiguration extends WebSecurityConfigurerAdapter {
@Override
protected void configure(AuthenticationManagerBuilder auth)
throws Exception {
auth
.inMemoryAuthentication()
.withUser("user")
.password("password")
.roles("USER")
.and()
.withUser("admin")
.password("admin")
.roles("USER", "ADMIN");
}
@Override
protected void configure(HttpSecurity http) throws Exception {
http
.authorizeRequests()
.anyRequest()
.authenticated()
.and()
.httpBasic();
}
}
|
16.2. OAuth2 Auto-Configuration
https://www.javainuse.com/spring/spring-boot-oauth-introduction
OAuth (Open Authorization) is a simple way to publish and interact with protected data. It is an open standard for token-based authentication and authorization on the Internet. It allows an end user’s account information to be used by third-party services, such as Facebook, without exposing the user’s password.
Spring Boot has a dedicated auto-configuration support for OAuth2. https://docs.spring.io/spring-security-oauth2-boot/docs/current/reference/htmlsingle/
Before we get to that, let’s add the Maven dependency to start setting up our application:
1 2 3 4 | <dependency>
<groupId>org.springframework.security.oauth.boot</groupId>
<artifactId>spring-security-oauth2-autoconfigure</artifactId>
</dependency>
|
This dependency includes a set of classes that are capable of triggering the auto-configuration mechanism defined in OAuth2AutoConfiguration class.
16.3. JWT
https://www.javainuse.com/spring/jwt
16.3.1. JWT
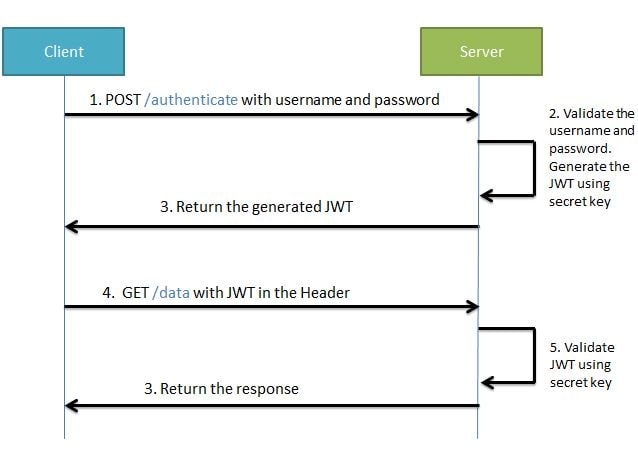
During the first request the client sends a POST request with username and password. Upon successful authentication the server generates the JWT sends this JWT to the client. This JWT can contain a payload of data. On all subsequent requests the client sends this JWT token in the header. Using this token the server authenticates the user. So we don’t need the client to send the user name and password to the server during each request for authentication, but only once after which the server issues a JWT to the client. A JWT payload can contain things like user ID so that when the client again sends the JWT, you can be sure that it is issued by you, and you can see to whom it was issued.
16.4. 参考
- https://github.ibm.com/lanzejun/fullstack/tree/master/spring/jwt
- https://medium.com/swlh/spring-boot-security-jwt-hello-world-example-b479e457664c
- https://www.javainuse.com/spring/jwt
- https://www.baeldung.com/java-config-spring-security
- https://docs.spring.io/spring-security/site/docs/current/guides/html5/helloworld-boot.html